

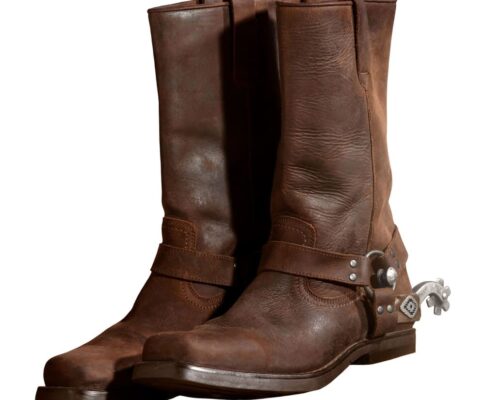
The natural material of leather boots stretches and softens with wear, particularly when exposed to heat, moisture, or normal movement. This can eventually result in leather boots losing their snug fit, which can cause pain, blisters, or make walking difficult. Although purchasing new boots is an option, you can prolong the life of your current boots and restore their fit by shrinking them.
An Understanding of Leather Boots
The nature of Leather Boots must be understood before beginning the shrinking process. The natural material of leather boots can be worked with heat and moisture. However, different types of leather respond differently to these methods. Be cautious at all times because aggressive methods can harm the material. If in doubt, seek advice from a qualified cobbler or boot repair shop.
Method 1: The Water Soaking Method
Soaking leather boots in water is one of the best ways to reduce shrinkage. By doing this, the leather is able to absorb moisture, becoming pliable and more easily molded to fit your feet.
Steps to Follow:
- Create a Water Bath: Pour lukewarm water into a large container, like a bucket or bathtub. Verify that your boots are fully immersed in the water.
- Put the Boots in the Water: Make sure the water completely submerges your leather boots. Give them approximately an hour to soak. Enough moisture must be absorbed by the leather during this soaking period.
- Soak Your Socks: Take a pair of socks that fit properly and soak them in water until they are completely saturated, while the boots are soaking.
- Wear Wet Socks and Boots: Put on the wet socks after the boots have soaked, and then put on your boots on top of them. Although it could take some work, this is necessary for the shrinking process.
- Walk Around: Continue to wear the wet boots and socks until the socks are completely dry, or for the remainder of the day. The leather will shrink and take on the contours of your feet as it dries, improving fit.
Important Considerations:
- Drying Time: After the socks are totally dry, wear the boots. Make appropriate plans because this procedure may take several hours.
- Comfort: Although this approach works well, at first it might be uncomfortable. Although the wet leather may feel tight, it will eventually mold to your feet.
Method 2: The Blow Dry and Spray Method
If you want to shrink leather boots more quickly, you can do so without soaking them by using a hair dryer and a spray bottle.
Steps to Follow:
- To prepare the spray: pour hot water into a spray bottle. The heat will help the leather shrink more effectively.
- Wet the Boots: Make sure your leather boots are thoroughly wet by liberally misting their exterior surfaces. Areas that feel loose or require more tightening should be the focus.
- Blow Dry the Leather: Turn the heat down on your hair dryer. Over the sprayed areas, move it back and forth while keeping it about six inches from the boots. Heat and moisture together will cause the leather to shrink.
- Try Them On: To check if the boots fit better after blow-drying, put them on. To get the right fit, repeat the spraying and blow-drying steps if they are still too loose.
Important Considerations:
- Avoid Overheating: To prevent damaging the leather, take care not to hold the hairdryer too close or use high heat.
- Conditioning: To keep the leather supple and stop cracking, it’s best to use a leather conditioner after applying heat.
Method 3: The Freezing Method
The freezing method can work especially well for people who need to target particular parts of their boots.
Steps to Follow:
- Make a Water Bag: Fill a plastic bag with one-third of the water, or about one gallon. Take out as much air as you can before sealing.
- Put the Bag in: The water-filled bag should be placed inside the boots where it will stretch. Position the bag appropriately if the toe or heel requires additional space.
- Freeze the Boots: Put the boots in the freezer for the entire night. The leather will stretch as the water expands when it freezes.
- Thaw Before Removal: Before attempting to remove the bag, let it thaw for around 20 minutes. To prevent harming the leather, this step is essential.
Important Considerations:
- Targeted Stretching: Although this technique works wonders for certain regions, it might not reduce the boot’s overall size.
- Check for Damage: After using this technique, always check your boots to make sure there is no damage.
Tips for Maintaining Leather Boots
Your leather boots will last longer and continue to look fantastic if you take good care of them after you’ve successfully shrunk them.
- Frequent Conditioning: To keep leather soft and avoid drying it out, use a high-quality leather conditioner on a regular basis.
- Proper Storage: In order to avoid warping and fading, keep your boots out of direct sunlight and in a cool, dry location.
- Avoid Too Much Moisture: Leather can withstand a certain amount of moisture, but too much of it can cause damage. After getting wet, always make sure your Lather Boots are completely dry.
Conclusion
If done properly, shrinking leather boots can be a simple procedure. Every method has benefits, whether you decide to soak them, use a spray and blow dryer, or freeze them. Keep in mind that leather is a delicate material that needs to be handled carefully at all times. These techniques will guarantee that your leather boots fit flawlessly so you can continue to appreciate their comfort and style for many years to come.
Pingback:How to Fix Squeaky Shoes: The Noise Silencing Solution and Tips - Shoesidea